

These Extra Fudgy Date Brownies are a must make for a healthier brownie alternative using just 6 ingredients. Plus they are vegan, dairy-free and gluten-free as well.
If there is one thing I will never stop making on repeat in my kitchen, it’s brownies. But not just any brownies – date brownies. These are rich, fudgy, chocolatey, slightly salty, and naturally sweetened with dates instead of refined sugar. And the best part? They’re made in the food processor in minutes.
If you’ve been around here for a while, you know I love a better-for-you dessert that still tastes indulgent. These date brownies check every box. They’re gluten-free, dairy-free, refined sugar-free, and made with wholesome pantry ingredients – but they taste like the brownie you actually want to eat.
Let’s get into it.
Why You’ll Love These Date Brownies
There’s something magical about baking with dates. They add natural sweetness, moisture, and that deep caramel-like flavor that makes chocolate taste even richer.
These date brownies are:
-
Naturally sweetened with pitted dates
-
Gluten-free (made with almond flour)
-
Dairy-free
-
Fudgy and dense
-
Packed with chocolate flavor
-
Easy to make in one bowl (or food processor!)
-
Kid-friendly and freezer-friendly
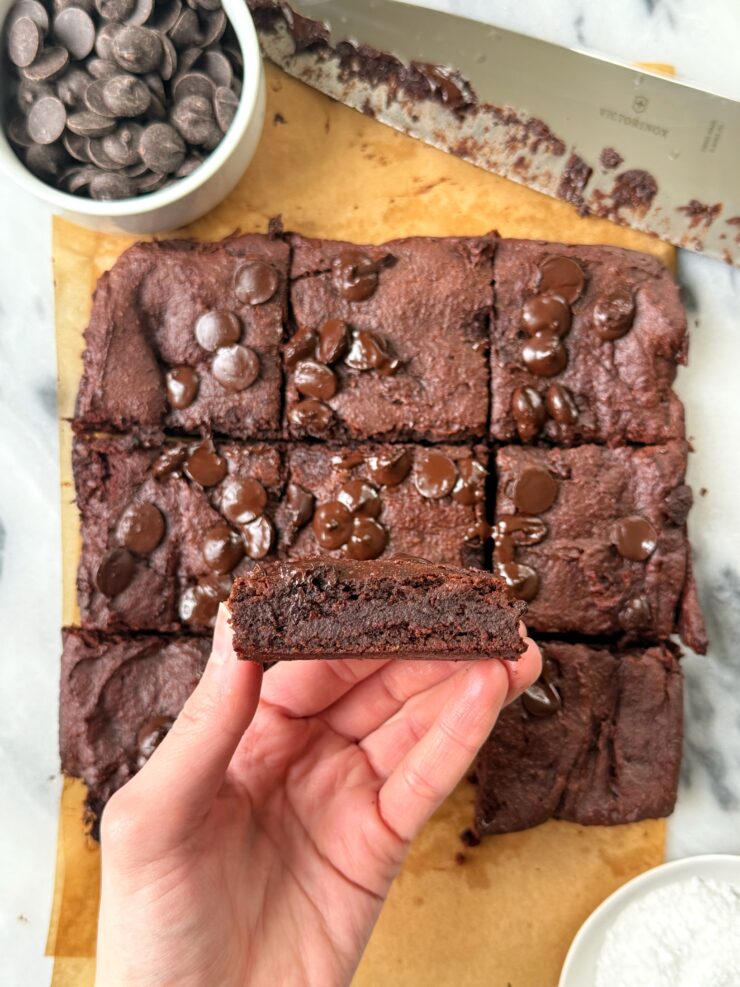
They’re the kind of treat you can make for an afternoon snack, pack into lunchboxes, bring to a playdate, or serve after dinner with flaky sea salt on top.
And yes – they pass the husband and kid test.
Why These Ingredients Work
Let’s break it down.
Pitted dates
Dates are the star of these date brownies. Once soaked in hot water and blended, they transform into a smooth paste that acts as both the sweetener and binder. They give the brownies that rich, caramel undertone and keep them incredibly moist.
If your dates feel firm, don’t skip the soaking step — it makes blending so much easier.
Creamy peanut butter
Peanut butter adds richness, structure, and healthy fats. It also gives these brownies a subtle nutty depth that pairs perfectly with dark chocolate.
You can swap in almond butter if needed, but peanut butter truly makes these next-level.
Flaxmeal
Flaxmeal works as a binder and helps create that classic brownie texture without eggs. It also adds a boost of fiber and omega-3s.
Cacao Powder
Cacao powder gives these brownies a deep, intense chocolate flavor. You can use unsweetened cocoa powder if that’s what you have — both work beautifully.
Almond flour
Almond flour keeps the brownies tender and slightly chewy while making them naturally gluten-free.
Dark chocolate chips + Sea Salt
Chocolate chips melted throughout the batter create pockets of gooey chocolate in every bite. And the sea salt? Non-negotiable. It balances the sweetness and makes the chocolate pop.


How to Make Date Brownies
These come together quickly — especially if you have a food processor.
Step 1: Prep Your Pan
Preheat your oven to 350°F (180°C).
Line a 9-inch brownie pan with parchment paper. Lightly oil the paper and pan with cooking spray and set aside.
This step makes removal super easy later.
Step 2: Soften the Dates
Place the pitted dates in a glass bowl. Pour the boiled water over the top, making sure the dates are mostly submerged.
Press them gently with a fork to help them soften evenly.
Cover the bowl with a plate or lid and let sit for 10 minutes.
This step is key to getting a smooth paste.
Step 3: Blend the Base
Transfer the dates and soaking water to your food processor.
Add:
-
Peanut butter
-
Flaxmeal
Process on medium-high speed for about 1 minute, until a smooth date paste forms.
Scrape down the sides as needed.
Step 4: Add the Dry Ingredients
Open the food processor and add:
-
Cacao powder
-
Almond flour
-
Vanilla extract
-
Baking soda
-
Sea salt
Process again on high speed until a thick, super sticky chocolate batter forms.
It will be dense — that’s exactly what we want.
Step 5: Fold in the Chocolate Chips
Add the dark chocolate chips and pulse a few times until evenly distributed.
Try not to over-process here — just enough to mix them in.
Step 6: Spread the Batter
Transfer the batter into your prepared pan using a rubber spatula. Warning: it will be sticky and messy. Totally normal.
Spread it around the pan as best you can. Now for my favorite trick: Cut a piece of parchment paper slightly smaller than the pan. Spray one side with cooking oil.
Place the oiled side down on top of the brownie batter. Press down with your hand first, then use the bottom of a measuring cup or glass to firmly press and smooth the batter into an even layer. Peel off the parchment paper and discard.
Perfectly smooth brownies every time.
Step 7: Bake
Bake at 350°F (180°C) for 25–30 minutes, or until the top looks dry and a toothpick inserted comes out mostly clean (a few fudgy crumbs are fine).
Do not overbake – that’s how you lose the fudgy texture.
Step 8: Cool
Let the brownies cool in the pan for 10 minutes.
Then transfer them to a cooling rack to cool completely before slicing.
If you want ultra-clean cuts, chill them in the fridge for 30–60 minutes first.

Texture: What to Expect
These date brownies are:
-
Dense
-
Fudgy
-
Moist
-
Slightly chewy
-
Richly chocolatey
They are not cakey. They are not airy.
They are deep, dark, chocolate-forward brownies with a caramel undertone from the dates.
If you love a gooey center brownie, this is for you.
Tips for the Best Date Brownies
Use soft Medjool dates
They blend better and taste sweeter.
Don’t skip soaking
Even soft dates benefit from it.
Let them cool fully
They firm up as they cool.
Add flaky sea salt on top before baking
Trust me on this.
Store in the fridge for extra fudginess
Cold brownies = denser, richer bites.

How to Store
-
Store in an airtight container at room temperature for 2 days.
-
Refrigerate for up to 1 week.
-
Freeze for up to 3 months.
To freeze: slice first, then freeze individually for easy grab-and-go treats.
Variations
Want to switch things up? Try these:
Peanut Butter Swirl
Warm 2 tablespoons peanut butter and swirl it on top before baking.
Walnut Date Brownies
Fold in 1/3 cup chopped walnuts for crunch.
Espresso Boost
Add 1 teaspoon espresso powder to intensify the chocolate flavor.
Extra Chocolate
Press more chocolate chips on top before baking.

Are Date Brownies Healthy?
I always say: healthy is relative.
These date brownies are made with whole-food ingredients, naturally sweetened, gluten-free, and contain fiber and healthy fats.
But they’re still dessert.
They’re just a more nourishing dessert option that won’t spike your blood sugar the same way traditional brownies might.
Balance is everything.
Can I Make These Nut-Free?
Yes! Swap peanut butter for sunflower seed butter and use the same measurements.
The texture stays almost identical.
Can I Make Them Vegan?
They already are!
No eggs. No dairy. Just simple plant-based ingredients.
Perfect For
-
After-school snacks
-
Lunchboxes
-
Post-dinner dessert
-
Holiday trays
-
Meal prep
-
Sharing with friends
-
Keeping in your freezer for emergencies
You know those moments when you need chocolate immediately? These are your solution.
Why Dates Are So Underrated in Baking
I truly believe dates are one of the most underrated baking ingredients.
They:
-
Add natural sweetness
-
Provide moisture
-
Help bind ingredients
-
Create a caramel-like flavor
-
Reduce the need for added sugar
In these date brownies, they replace both sugar and some of the fat – without sacrificing texture.
Once you start baking with dates, it’s hard to go back.
The Kid Test
These are 100% kid-approved.
They taste like real brownies — not “healthy brownies.”
You can absolutely tell your kids they’re chocolate brownies and leave it at that. No explanation necessary.
And if you’re like me and always looking for snack options made with simple ingredients, these are a staple.
Final Thoughts on These Date Brownies
If you’re looking for a rich, chocolatey, better-for-you dessert that comes together quickly and uses pantry staples, these date brownies are it.
They’re fudgy, decadent, naturally sweetened, freezer-friendly, wildly addictive.
And once you make them, I promise they’ll become a regular in your kitchen.
If you try these date brownies, let me know. Tag me, share them, save them – I love seeing what you make.
Now go preheat that oven. 🍫
PrintExtra Fudgy Date Brownies (gluten-free + vegan)
These Extra Fudgy Date Brownies are a must make for a healthier brownie alternative using just 6 ingredients. Plus they are vegan, dairy-free and gluten-free as well.
- Prep Time: 20 mins
- Cook Time: 25 mins
- Total Time: 55 mins
Yield: 9 brownies 1x
Ingredients
- 1.5 cups pitted dates
- 2/3 cup boiled water
- 3/4 cup creamy peanut butter
- 2 tablespoons flaxmeal (ground up flaxseed)
- 1/2 cup cacao powder
- 1/3 cup almond flour
- 1 teaspoon vanilla extract
- 3/4 teaspoon baking soda
- 1/2 cup dark chocolate chips
- 1/2 teaspoon sea salt
Instructions
- Prep Your Pan: Preheat your oven to 350°F (180°C). Line a 8-inch brownie pan with parchment paper. Lightly oil the paper and pan with cooking spray and set aside.
- Soften the Dates: Place the pitted dates in a glass bowl. Pour the boiled water over the top, making sure the dates are mostly submerged. Press them gently with a fork to help them soften evenly.
- Cover the bowl with a plate or lid and let sit for 10 minutes.
- Blend the Base: Transfer the dates and soaking water to your food processor.
- Add: Peanut butter and flaxmeal. Process on medium-high speed for about 1 minute, until a smooth date paste forms. Scrape down the sides as needed.
- Add the Dry Ingredients: Open the food processor and add: Cacao powder, Almond flour, Vanilla extract, Baking soda, Sea salt
- Process again on high speed until a thick, super sticky chocolate batter forms. It will be dense – that’s exactly what we want.
- Fold in the Chocolate Chip: Add the dark chocolate chips and pulse a few times until evenly distributed. Try not to over-process here – just enough to mix them in.
- Spread the Batter: Transfer the batter into your prepared pan using a rubber spatula. Warning: it will be sticky and messy. Totally normal.
- Spread it around the pan as best you can.
- Cut a piece of parchment paper slightly smaller than the pan. Spray one side with cooking oil.
- Place the oiled side down on top of the brownie batter.
- Press down with your hand first, then use the bottom of a measuring cup or glass to firmly press and smooth the batter into an even layer.
- Peel off the parchment paper and discard.
- Perfectly smooth brownies every time.
- Bake: Bake at 350°F (180°C) for 25–30 minutes, or until the top looks dry and a toothpick inserted comes out mostly clean (a few fudgy crumbs are fine). Do not overbake – that’s how you lose the fudgy texture.
- Cool: Let the brownies cool in the pan for 10 minutes. Then transfer them to a cooling rack to cool completely before slicing. If you want ultra-clean cuts, chill them in the fridge for 30–60 minutes first.
Notes
*Store in airtight container for 5 days or freezer for 2 months
 Share this recipe
Rebecca Blitz
These are sneaky good! Never thought I’d love them so much but wow these are going to be on repeat.