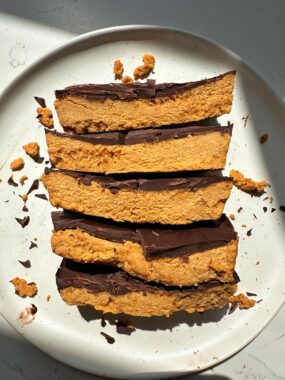
These No-bake Pumpkin Peanut Butter Bars are one of the most delicious and easy pumpkin desserts to make. The ultimate recipe for all the peanut butter and pumpkin lovers! Made with gluten-free and vegan ingredients. 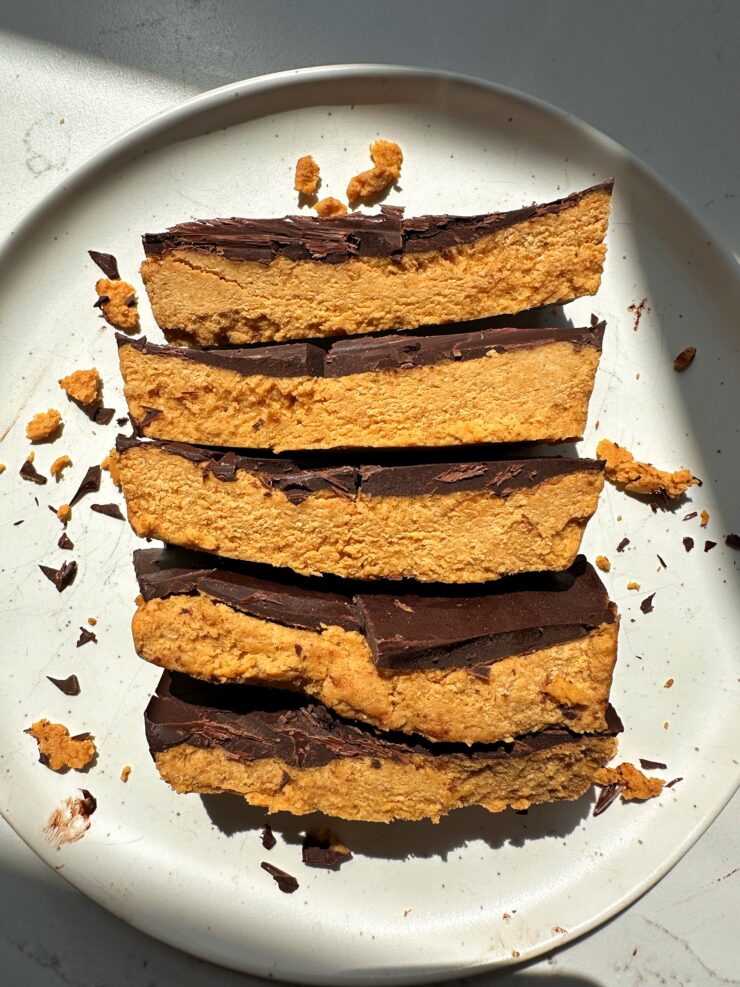
Fall is in full swing, and that means it’s time to embrace the flavors of the season. If you’re a fan of pumpkin spice, peanut butter, and easy, no-bake recipes, you’re in for a treat! These Pumpkin Peanut Butter Bars are not only delicious, but they’re also healthy, quick to make, and require zero oven time. Whether you’re hosting a fall get-together or just looking for a snack to enjoy with a warm cup of coffee, these bars are perfect for any occasion.
Why You’ll Love These Pumpkin Peanut Butter Bars
- Simple and Quick: With just a handful of ingredients and no baking required, you can whip these bars up in under 15 minutes.
- Healthy Ingredients: Made with pumpkin puree, peanut butter, oat flour, and maple syrup, these bars are packed with nutrients.
- Perfect for Fall: Infused with pumpkin pie spice, these bars scream fall in every bite.
- Customizable: You can easily adjust the recipe to fit your dietary needs or personal preferences.
- Kid-Friendly: These bars make for a great snack that kids and adults alike will enjoy.
Let’s dive into the recipe for these delicious Pumpkin Peanut Butter Bars!
Ingredients You’ll Need:
- Pumpkin puree: Pumpkin adds moisture and a subtle sweetness, making it a perfect base for these bars. It’s also packed with vitamins and fiber.
- Peanut butter: Creamy peanut butter adds a rich and satisfying flavor while contributing healthy fats and protein.
- Maple syrup: A natural sweetener that adds depth to the bars without refined sugars.
- Pumpkin pie spice: This warming spice blend adds the quintessential fall flavor. You can use store-bought or make your own by mixing cinnamon, nutmeg, ginger, and cloves.
- Oat flour: Oat flour helps to bind the ingredients together and adds a slight nutty flavor. Plus, it’s gluten-free (if you use certified gluten-free oats).
- Vanilla extract: Vanilla enhances the overall flavor and adds a touch of sweetness.
- Chocolate chips: Optional but highly recommended! Who doesn’t love a little chocolate with their peanut butter?
How to Make No-Bake Pumpkin Peanut Butter Bars:
Step 1: Combine the Wet Ingredients
Start by mixing the pumpkin puree, peanut butter, maple syrup, and vanilla extract in a medium-sized bowl. You can use a spatula or a hand mixer to ensure everything is well combined. The mixture should be smooth, creamy, and slightly thick. This step is crucial as the wet ingredients serve as the binding agent for the bars.
Step 2: Add the Dry Ingredients
Once the wet ingredients are well mixed, it’s time to fold in the dry ingredients. Add the pumpkin pie spice and oat flourto the bowl. Stir until everything is well incorporated. The consistency should be thick and somewhat sticky, which is exactly what you want for no-bake bars.
Step 3: Melt the Chocolate Chips
Add chocolate chips to microwave safe bowl and melt (add coconut oil if needed). 30 second increments.
Step 4: Press the Mixture into a Pan
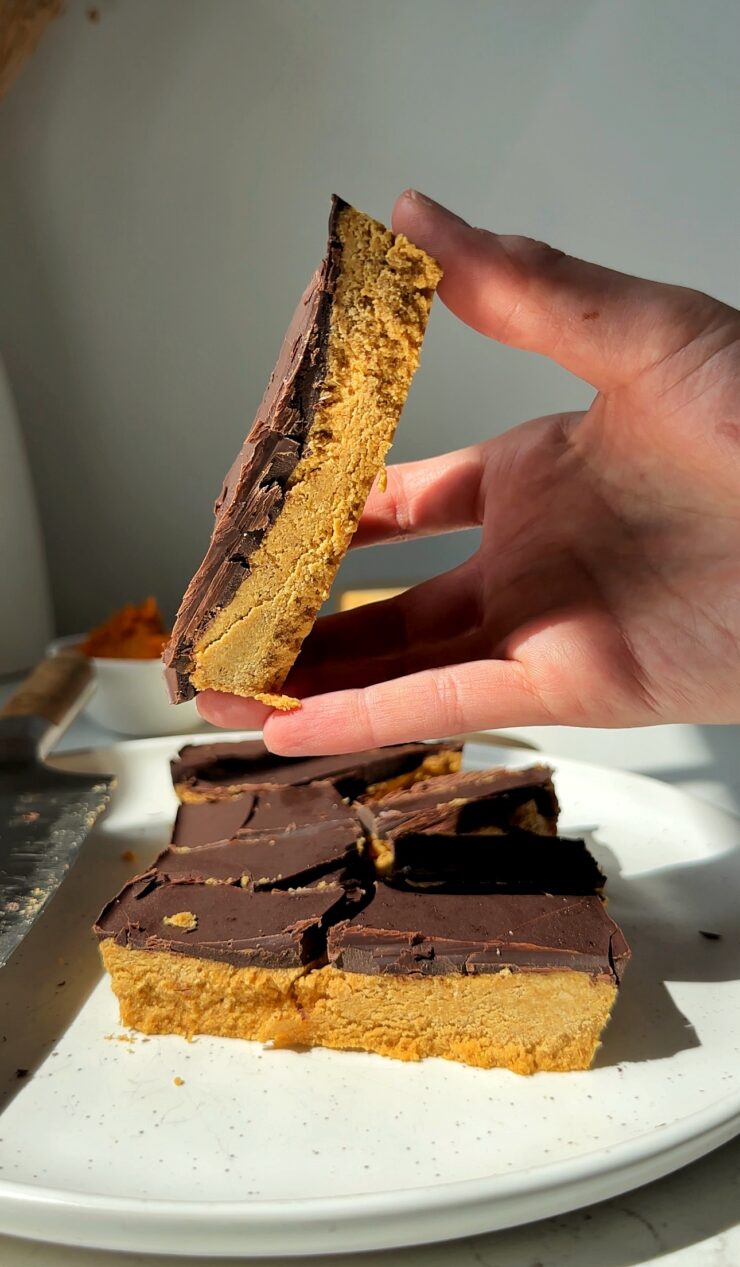
Line an 8×8-inch baking pan with parchment paper or lightly grease it with non-stick spray. Press the mixture evenly into the pan using a spatula or the back of a spoon. Make sure the mixture is compact and even, as this will help the bars hold together when cut. Then pour melted chocolate on top and spread.
Step 5: Chill and Set
Pop the pan into the refrigerator for at least 1-2 hours to allow the bars to firm up. If you’re in a hurry, you can place them in the freezer for about 30 minutes. Once the bars are firm and set, they’re ready to be sliced and enjoyed.
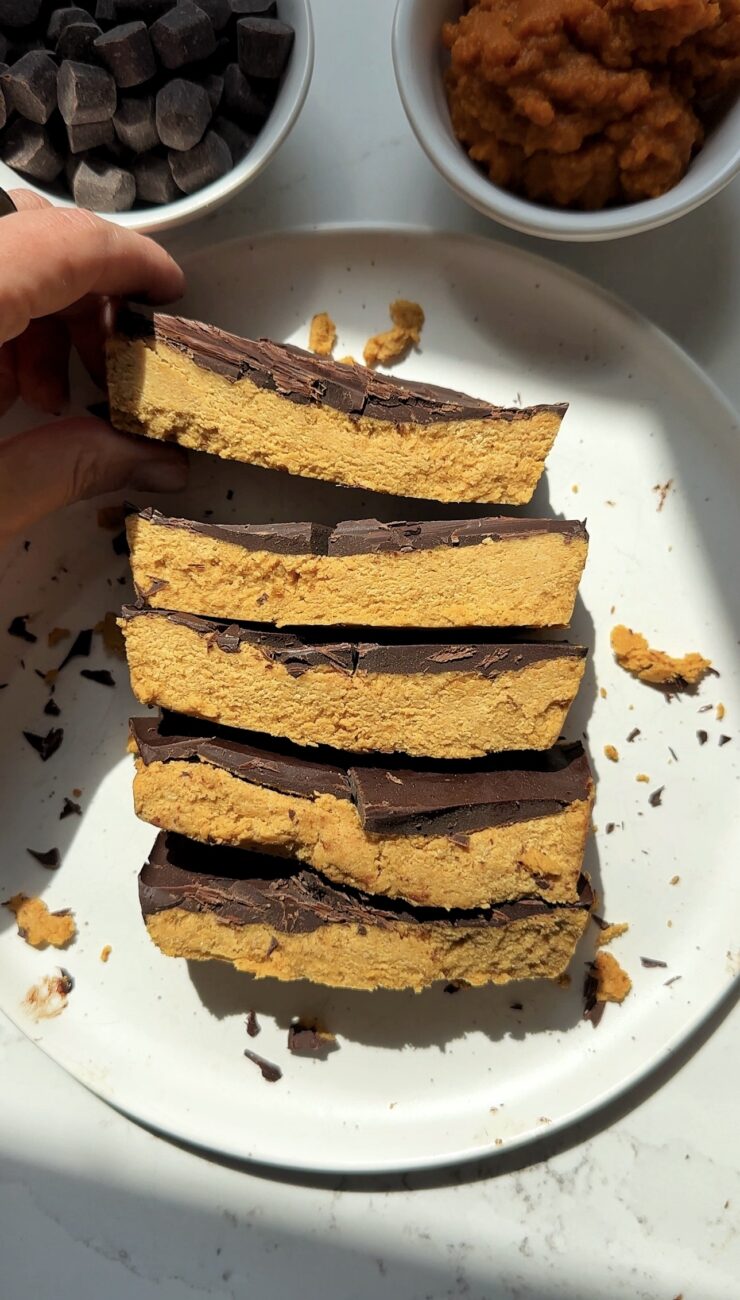
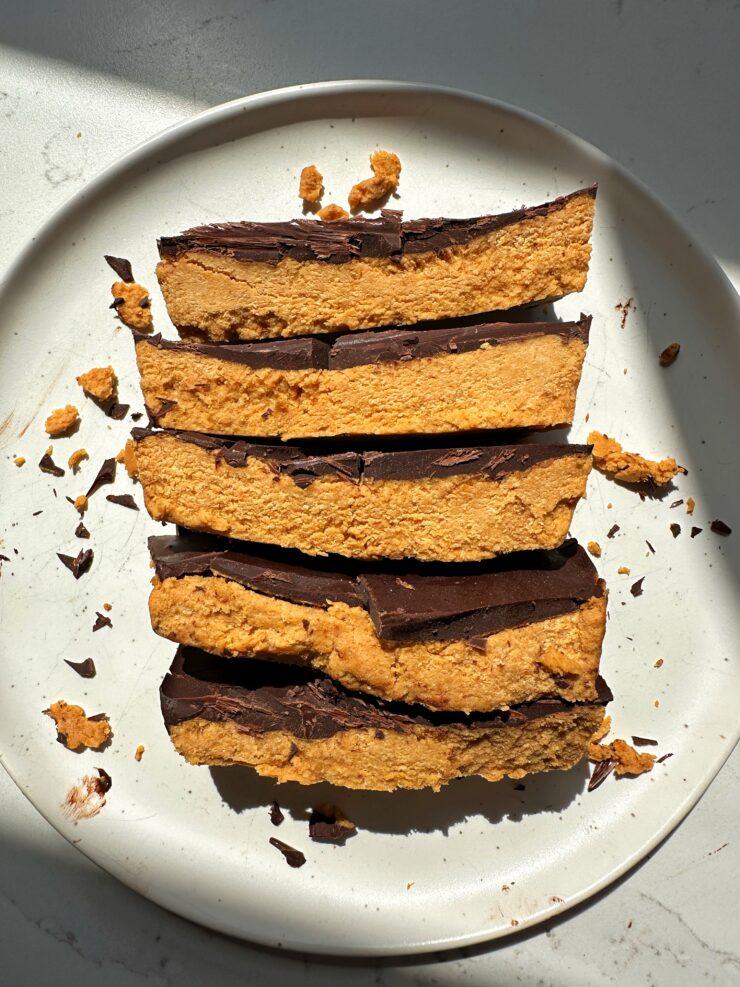
Step 6: Slice and Enjoy
Once the bars have chilled, remove them from the pan by lifting the parchment paper and placing it on a cutting board. Use a sharp knife to cut the bars into squares or rectangles. Now, all that’s left to do is enjoy your delicious Pumpkin Peanut Butter Bars!
Customization Tips:
One of the best things about this recipe is how easy it is to customize. Here are a few ideas to make these Pumpkin Peanut Butter Bars your own:
- Nut Butter Alternatives: If you have a peanut allergy or simply prefer other nut butters, feel free to substitute with almond butter, cashew butter, or sunflower seed butter.
- Add-Ins: Want to make these bars even more exciting? Add in your favorite mix-ins like chopped nuts, dried fruit, or coconut flakes.
- Spice Level: If you love the flavor of pumpkin spice, you can increase the amount of pumpkin pie spice or even add a pinch of cinnamon on top before chilling the bars.
- Chocolate Drizzle: For an extra touch of indulgence, melt some additional chocolate chips and drizzle over the top of the bars once they’ve set in the fridge.
- Protein Boost: Looking to add some extra protein to these bars? Stir in a scoop of your favorite vanilla or unflavored protein powder. Just be sure to adjust the amount of liquid if the mixture becomes too dry.
Why Pumpkin and Peanut Butter Make a Great Combo:
Pumpkin and peanut butter might seem like an unusual pairing, but trust us, it works beautifully! Here’s why:
- Flavor Balance: The natural sweetness of pumpkin puree pairs perfectly with the richness of peanut butter. Combined with a hint of spice from the pumpkin pie spice, these bars offer a well-balanced flavor profile.
- Nutrient-Dense: Pumpkin is packed with vitamins A and C, while peanut butter provides healthy fats and protein. Together, they create a snack that’s not only tasty but also nourishing.
- Seasonal Vibes: Pumpkin is the star of fall, and combining it with peanut butter creates a seasonal treat that feels indulgent yet wholesome.
Storing Your Pumpkin Peanut Butter Bars:
These bars store wonderfully, making them perfect for meal prepping or keeping on hand for when a sweet craving strikes. Here’s how to store them:
- In the Refrigerator: Store the bars in an airtight container in the refrigerator for up to one week. They’ll stay firm and ready to grab as a quick snack or dessert.
- In the Freezer: If you want to keep the bars for longer, store them in the freezer. They’ll last for up to 2 months. Just be sure to let them thaw for a few minutes before eating.
These No-Bake Pumpkin Peanut Butter Bars are the perfect fall treat. Whether you’re looking for a quick snack to enjoy during the busy week or a dessert to bring to a gathering, these bars are sure to be a hit. With the combination of rich peanut butter, subtle pumpkin flavor, and the warmth of pumpkin pie spice, every bite tastes like fall. Plus, with the added bonus of being no-bake and easy to customize, this recipe is one you’ll want to make over and over again.
Give these bars a try, and don’t forget to share them with family and friends! Whether you’re a pumpkin lover or just a fan of easy, delicious snacks, these Pumpkin Peanut Butter Bars are sure to satisfy your cravings.
Happy snacking!
PrintNo-bake Pumpkin Peanut Butter Bars (vegan + gluten-free)
These No-bake Pumpkin Peanut Butter Bars are one of the most delicious and easy pumpkin desserts to make. The ultimate recipe for all the peanut butter and pumpkin lovers! Made with gluten-free and vegan ingredients.
- Prep Time: 10 mins
- Total Time: 1 hour
Yield: 9 bars 1x
Ingredients
- 1/4 cup pumpkin puree
- 1/2 cup peanut butter
- 1/4 cup maple syrup
- 1/2 teaspoon pumpkin pie spice
- 1 cup oat flour
- 1 tsp vanilla extract
- 1/2 cup chocolate chips
Instructions
- Start by mixing the pumpkin puree, peanut butter, maple syrup, and vanilla extract in a medium-sized bowl. You can use a spatula or a hand mixer to ensure everything is well combined. The mixture should be smooth, creamy, and slightly thick.
- Once the wet ingredients are well mixed, it’s time to fold in the dry ingredients. Add the pumpkin pie spice and oat flourto the bowl. Stir until everything is well incorporated. The consistency should be thick and somewhat sticky, which is exactly what you want for no-bake bars.
- Next, melt chocolate chips in microwave safe bowl (add coconut oil if you want) in microwave in 30 second increments, stirring after each.
- Line an 8×8-inch baking pan with parchment paper or lightly grease it with non-stick spray.
- Press the mixture evenly into the pan using a spatula or the back of a spoon. Make sure the mixture is compact and even, as this will help the bars hold together when cut.
- Pour chocolate on top of the bars then pop the pan into the refrigerator for at least 1-2 hours to allow the bars to firm up. If you’re in a hurry, you can place them in the freezer for about 30 minutes.
- Once the bars are firm and set, they’re ready to be sliced and enjoyed.
- Once the bars have chilled, remove them from the pan by lifting the parchment paper and placing it on a cutting board. Use a sharp knife to cut the bars into squares or rectangles enjoy!
Notes
*Store in fridge for 5 days or freezer 2 months
 Share this recipe
Jean Haedrich
I just put these in the fridge to harden. They are so thin…can the base be doubled??
Rachel
really?? yes of course! maybe the brand PB used was thinner than mine. or pumpkin was more pureed. add more flour as needed 🙂
Jan
Can I substitute the oat flour for any other gf flour?
Rachel
you can try almond flour but you may need more!
Nancy
I don’t have oat flour. Can you suggest an alternative?
Rachel
you can try almond flour but you may need more!
carly
So easy to make! I used a small circle cookie cutter and made them like mini Reeses 🙂