These Twix Cookie Cups are a must try! Made with a cookie dough base, filled with chocolate, homemade peanut butter caramel and topped with more chocolate, you can’t go wrong with this dessert. 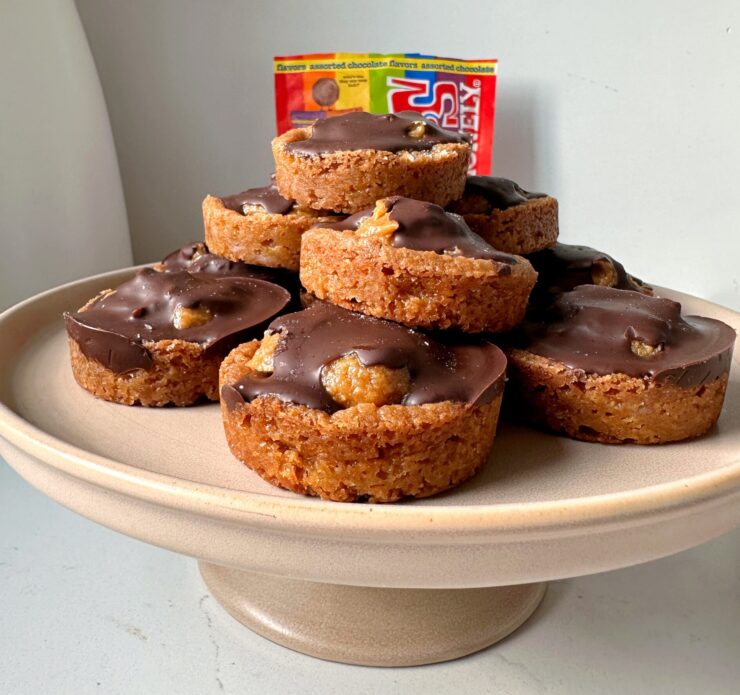
If you’re craving a twist on the classic Twix flavor in a fun, bite-sized treat, these Twix Cookie Cups are a must-try! With a soft cookie base, creamy caramel center, and a smooth chocolate drizzle, these cookie cups are the ultimate indulgence. The best part? They’re simple to make, using pre-made dough and a quick caramel sauce.
Why You’ll Love These Twix Cookie Cups:
Not only are these cookie cups delicious, but they’re also gluten-free and easily customizable with different chocolate or caramel options. They’re a hit at parties, family gatherings, or simply as a sweet snack to enjoy any day.
Happy baking, and enjoy every indulgent bite of these irresistible Twix Cookie Cups!
What ingredients you need to make these Twix Cookie Cups:
- Pre-made cookie dough – at room temperature. I used sugar cookie dough gluten-free
- Mini chocolates – I used these!
- Peanut butter caramel – from this recipe!
- Dark chocolate – you can use milk chocolate or semi-sweet if you want too

How to make Twix Cookie Cups:
-
Preheat Your Oven: Set the oven to 350°F to prepare for baking.
-
Prepare the Cookie Base: Take approximately 1-inch sections of the pre-made cookie dough and press them into a greased silicone muffin tray. Each slot should be filled to form a cookie cup base.
-
Bake: Place the tray in the oven and bake for 10 to 12 minutes or until the edges are lightly golden.
-
Make the Peanut Butter Caramel: While the cookie cups bake, prepare the peanut butter caramel. The caramel adds that essential chewy, nutty layer, making these cookie cups mimic a Twix bar’s unique texture and taste.
-
Shape the Cookie Cups: After removing the cookies from the oven, create a cup shape by pressing down the center of each dough cup. A tablespoon, shot glass, or spice jar works well to make the indentations.
-
Add the Chocolate: Allow the cups to cool for a couple of minutes. Then, place a piece of mini chocolate into each cup and gently press down, letting it melt slightly from the warmth of the cookie.
-
Layer on the Caramel: Spoon a generous amount of peanut butter caramel on top of each chocolate-filled cookie cup, spreading it evenly to cover the surface.
-
Drizzle with Chocolate: Finally, drizzle melted dark chocolate over each cup, creating that iconic Twix topping.
-
Set in the Fridge: Allow the cookie cups to set in the refrigerator for at least an hour. This gives the caramel and chocolate time to solidify, making them easy to remove and enjoy.
-
Enjoy Your Twix Cookie Cups: Gently remove each cookie cup from the tray, serve, and watch these treats disappear!

FAQs for Twix Cookie Cups:
Q: Can I use homemade cookie dough instead of pre-made?
Absolutely! If you prefer to make your own cookie dough, a basic sugar or shortbread cookie dough works well. Just make sure it’s at room temperature so it’s easy to press into the muffin tray.
Q: What type of chocolate works best?
I recommend using mini chocolate squares or bites that melt well. Dark, milk, or even white chocolate can work based on your preference. You could also use a caramel-filled chocolate for an extra boost of flavor!
Q: Can I make these dairy-free?
Yes! Use dairy-free chocolate and make sure your cookie dough and caramel are also dairy-free. Many pre-made cookie doughs and chocolates have dairy-free options.
Q: What if I don’t have a silicone muffin tray?
A regular muffin tray can work too. Just make sure to grease it very well, or line each cup with parchment paper to prevent sticking.
Q: How do I know when the cookie cups are done baking?
The edges should be golden brown, but the center will still be soft. They’ll firm up as they cool, making them perfect for holding the caramel and chocolate.
Tips for Making the Best Twix Cookie Cups:
-
Avoid Overfilling the Muffin Tray: Press the dough evenly into each cup so the base isn’t too thick. A 1-inch ball per cup usually works perfectly.
-
Press Down the Center Right Away: As soon as the cookie cups come out of the oven, use a tablespoon, shot glass, or spice jar to press down the center. This will create a perfect well for your chocolate and caramel filling.
-
Let Them Cool Slightly Before Adding Chocolate: Allow the cookie cups to cool for a few minutes so they don’t melt the chocolate too quickly. You want a gentle melt, not a total collapse of the chocolate structure.
-
Use Quality Chocolate and Peanut Butter: Since the recipe is simple, high-quality ingredients make a big difference in taste. Opt for your favorite brand of chocolate and a natural, creamy peanut butter for the caramel.
-
Chill in the Fridge to Set: Refrigerate the cookie cups for at least an hour after assembling. This makes them easier to remove from the tray and helps the layers stay intact when you bite into them.

Storage Instructions for Twix Cookie Cups:
Room Temperature:
If you plan to enjoy these within a day, you can keep the cookie cups at room temperature in an airtight container. Just be mindful that they may soften if it’s warm, as the chocolate and caramel can start to melt.
Refrigerator:
For longer storage, keep the cookie cups in an airtight container in the fridge. They’ll last for up to one week and will maintain their shape and texture better than at room temperature. Let them sit at room temperature for a few minutes before eating if you prefer a softer caramel center.
Freezer:
These Twix cookie cups also freeze well! Place them in a single layer on a baking sheet and freeze until solid. Then, transfer them to a freezer-safe container, separating layers with parchment paper to prevent sticking. They’ll keep in the freezer for up to three months. To enjoy, just thaw them in the fridge overnight or at room temperature for a few hours.
A few other recipes for chocolate peanut butter lovers:
The BEST Gluten-free Twix Bars!
Copycat Snickers Peanut Brownie Bars (gluten-free)
Chocolate Peanut Butter Crunch Cups
PrintDelicious Twix Cookie Cups! (gluten-free)
These Twix Cookie Cups are a must try! Made with a cookie dough base, filled with chocolate, homemade peanut butter caramel and topped with more chocolate, you can’t go wrong with this dessert.
- Prep Time: 10 mins
- Cook Time: 15 mins
- Total Time: 1 hour 15 minutes
Yield: 12 cookie cups 1x
Ingredients
- 10 ounces pre-made cookie dough, at room temperature (I used sugar cookie dough gluten-free)
- 12 mini chocolates (I used these)
- 1 batch peanut butter caramel (from this recipe)
- 1/4 cup dark chocolate, melted
Instructions
- Preheat oven to 350 degrees F
- Take about 1 inch sections of the premade dough and press them into a greased silicone muffin tray so they fill each slot
- Bake for 10 to 12 minutes
- As the cookies bake, make the peanut butter caramel
- Create cookie cups by pushing down the center of dough (use a tablespoon, shot class or spice jar)
- Allow the cups to cool for just a couple of minutes then add each piece of chocolate on top of each cookie and press down
- Add a generous spoonful of caramel on top of each cookie and chocolate and spread across
- Drizzle melted chocolate on top and allow the cookie cups to set in fridge for at least an hour
- Gently remove from muffin tray and enjoy!
Notes
*Store in airtight container for 3 days, 5 days in fridge or freezer for 2 months

 Share this recipe
Lindsey
This was so good. I cheated and ate one while it was still warm from the oven. Insane how good this was!!!
Rachel
thank you so much!!!