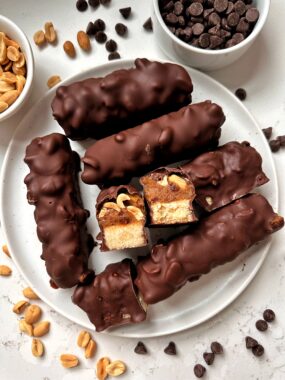
Copycat Snickers Peanut Brownie Bars: A Healthier Indulgence! Make the store-bought Snickers Peanut Brownie Bars but using all gluten-free and vegan ingredients.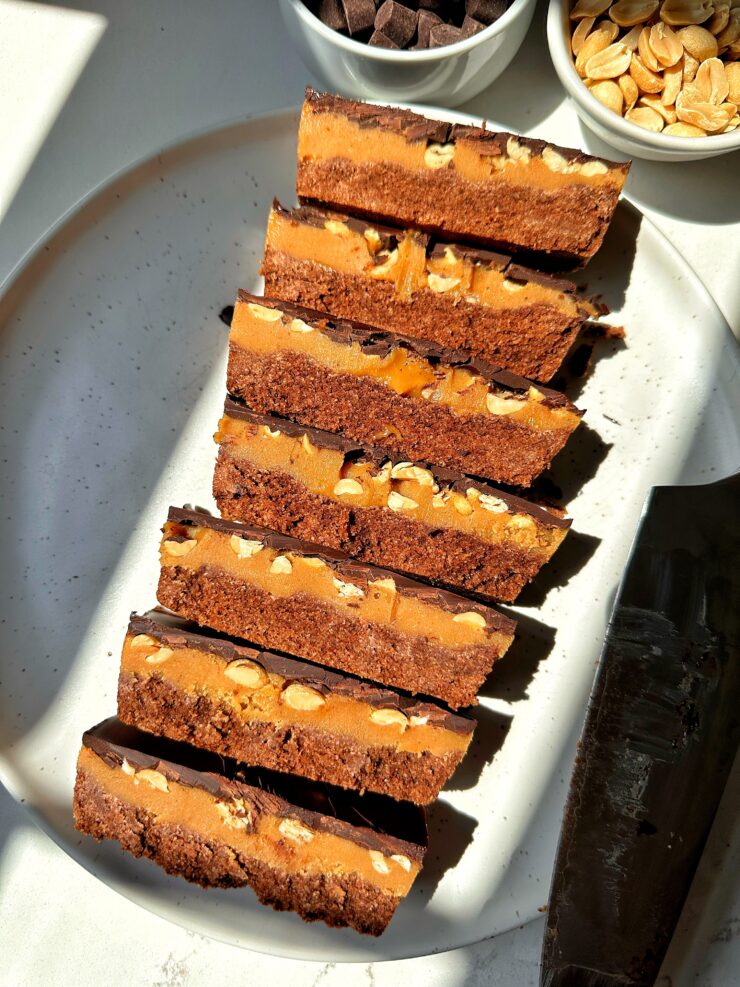
If you’ve ever found yourself craving the sweet, nutty, and chocolatey goodness of a Snickers bar but wished for a homemade, healthier version, you’re in for a treat! These Copycat Snickers Peanut Brownie Bars are the perfect balance of rich brownie, creamy caramel, crunchy peanuts, and decadent dark chocolate. Best of all, they’re made with wholesome ingredients that you can feel good about.
Why You’ll Love These Snickers Peanut Brownie Bars:
These bars are more than just a tasty snack. These are a guilt-free indulgence that combines the best of both worlds—deliciousness and nutrition. Unlike the classic store-bought Snickers, which can be loaded with processed sugars and unhealthy fats, these homemade bars use natural sweeteners like maple syrup or honey and nutrient-rich almond flour. The result is a treat that’s not only satisfying to your sweet tooth but also provides a boost of healthy fats and protein.
Ingredients you need to make these Snickers Peanut Brownie Bars:
Before diving into the recipe, let’s walk through the ingredients that make these bars both delicious and nutritious:
-
Almond flour: Almond flour is a fantastic alternative to traditional wheat flour. It’s gluten-free, low in carbs, and rich in healthy fats, protein, and fiber. This flour gives the brownie layer a slightly nutty flavor and a soft, moist texture.
-
Cacao powder: Cacao powder is the purest form of chocolate you can consume. It’s less processed than cocoa powder and retains more of the natural antioxidants and nutrients found in cacao beans. It adds a rich, chocolatey flavor to the brownie layer.
-
Vanilla extract: Vanilla extract enhances the overall flavor of the brownie layer, adding a touch of warmth and sweetness.
-
Creamy peanut butter: Peanut butter serves as the base for the caramel layer, offering a creamy texture and nutty flavor. It’s also a good source of protein and healthy fats.
-
Coconut oil (melted and cooled): Coconut oil is used again in the caramel layer to help solidify the mixture once it’s chilled. It also adds a slight richness to the caramel.
-
Maple syrup or honey: Just like in the brownie layer, maple syrup or honey is used to sweeten the caramel layer naturally. It balances the richness of the peanut butter and coconut oil, creating a perfectly sweet caramel.
-
Roasted peanuts, halved: Roasted peanuts add a satisfying crunch and a touch of saltiness.
- Chocolate chips (dark chocolate preferred): Dark chocolate is the crowning glory of these bars. It’s rich, decadent, and full of antioxidants. Opting for dark chocolate over milk chocolate reduces the sugar content and enhances the overall flavor of the bars.
Step-by-Step Instructions on how to make these:
-
Preheat and Prepare: Preheat your oven to 350 degrees Fahrenheit. Grease a loaf pan with coconut oil or line it with parchment paper for easy removal of the bars later on.
-
Make the Brownie Layer: In a large bowl, combine the almond flour, cacao powder, melted coconut oil, maple syrup or honey, and vanilla extract. Stir until the mixture is smooth and well combined. Press the batter firmly into the prepared loaf pan, ensuring an even layer across the bottom. Bake the brownie layer in the preheated oven for about 20 minutes, then set it aside to cool completely.
-
Prepare the Caramel Layer: While the brownie layer cools, prepare the caramel layer. In a medium-sized bowl, mix together the creamy peanut butter, melted coconut oil, maple syrup or honey, and vanilla extract until the mixture is smooth and creamy. Once the brownie layer is cool, spread the caramel mixture evenly over it.
-
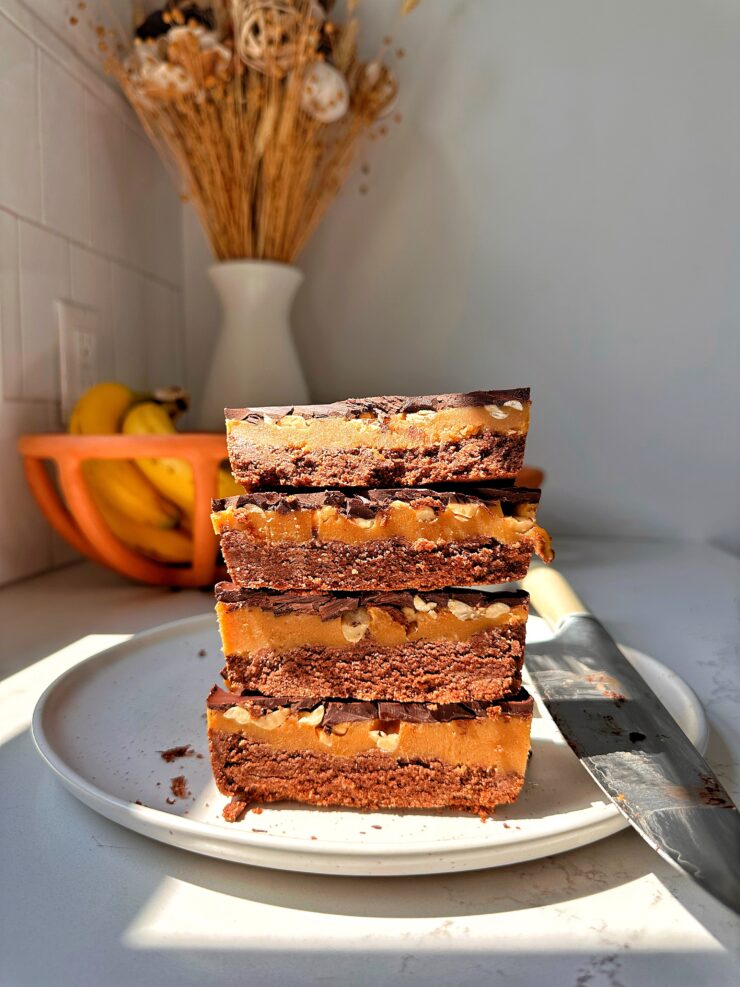
Add the Peanuts: Gently press the halved roasted peanuts into the caramel layer, distributing them evenly across the top. This step adds that classic Snickers crunch and flavor.
-
Chill in the Freezer: Place the pan in the freezer for about 30 minutes to allow the caramel layer to firm up. This will make it easier to add the chocolate layer on top.
-
Melt the Chocolate: Melt the dark chocolate chips in a microwave-safe bowl, heating in 30-second intervals
-
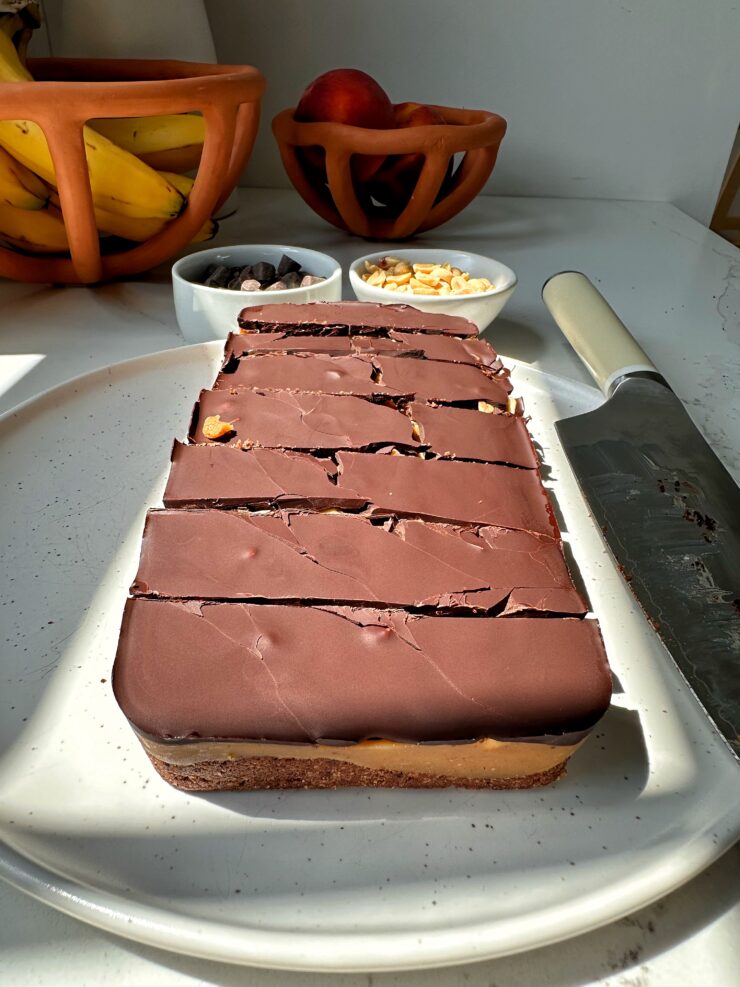
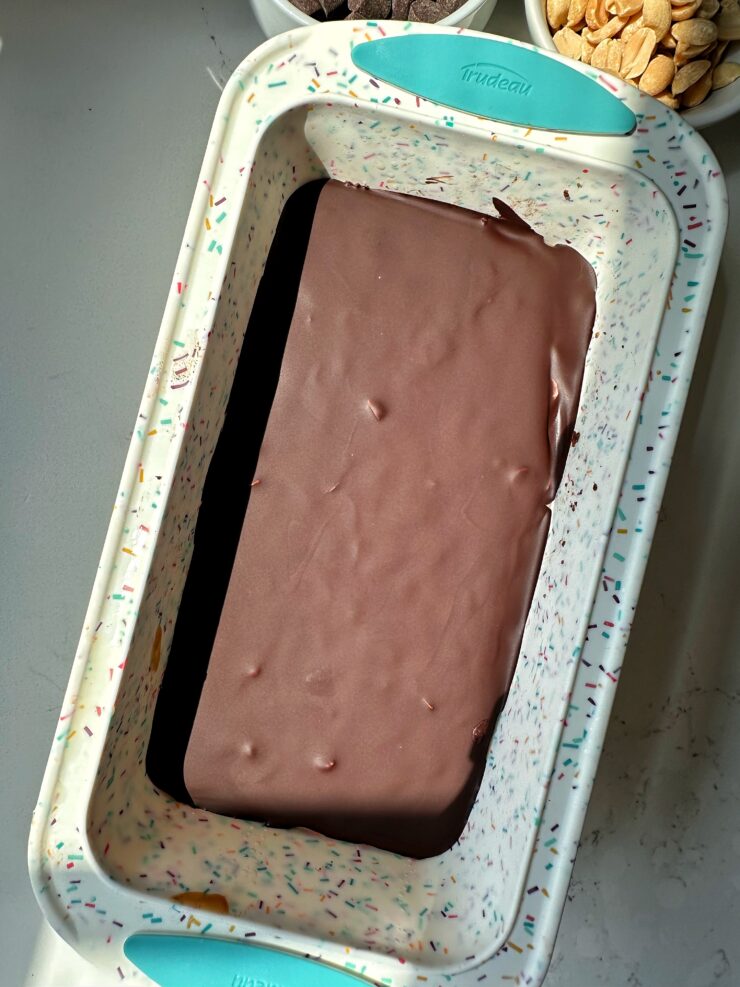
Add the Chocolate Layer: Remove the pan from the freezer and pour the melted chocolate over top. Spread the chocolate evenly to cover the entire surface. For an extra touch, you can sprinkle a few more chopped peanuts on top of the chocolate before it sets.
-
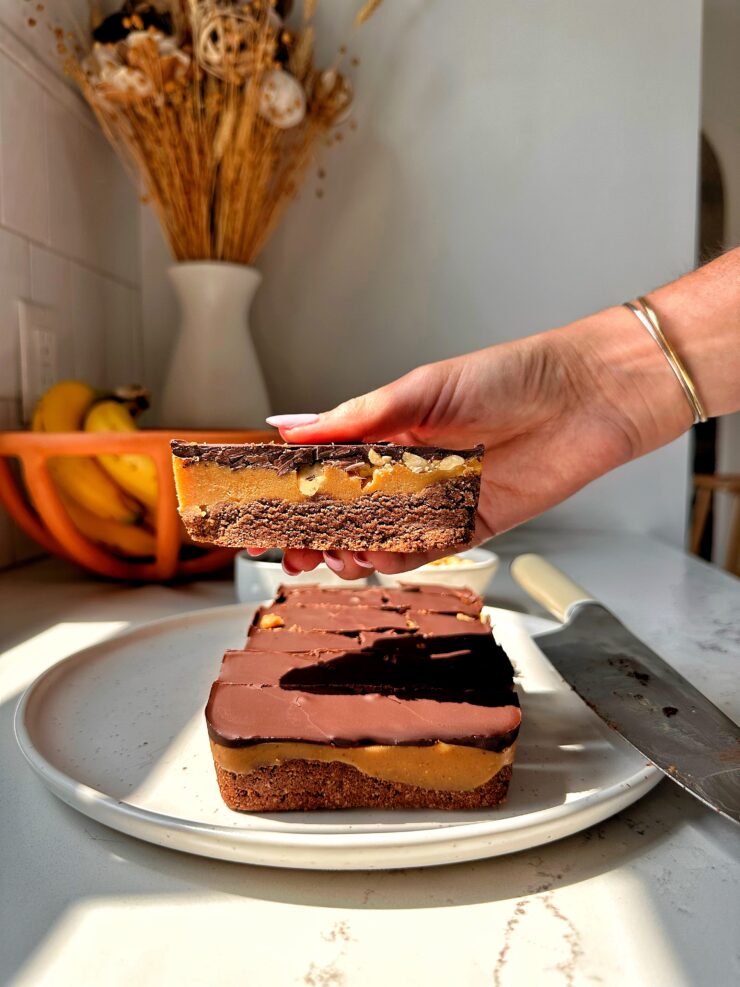
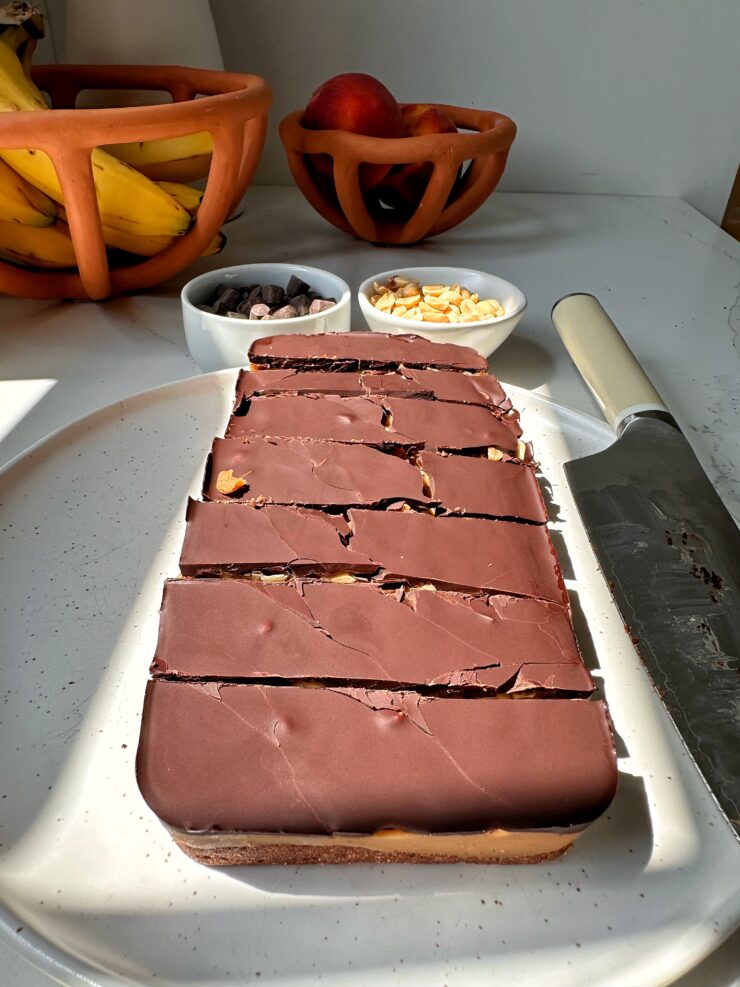
Final Chill and Serve: Return the pan to the freezer for about 1 hour, or until the chocolate layer is fully set. Once set, lift the bars out of the pan using the parchment paper, and cut them into even pieces.
FAQs for Making Snickers Peanut Brownie Bars:
- Can I substitute almond flour with another type of flour? If you’re allergic to almonds or don’t have almond flour on hand, you can try gluten-free oat flour.
- How do I store these bars? These bars are best stored in the refrigerator to keep the layers firm and the chocolate crisp. Place them in an airtight container and store them in the fridge for up to a week. If you prefer a softer texture, you can leave them out at room temperature for about 10-15 minutes before serving.
- Can I freeze the bars for later? Absolutely! These bars freeze well. After cutting them into individual pieces, place them in a single layer on a baking sheet and freeze for about an hour. Once frozen, transfer the bars to an airtight container or freezer bag and store them in the freezer for up to 2 months. When you’re ready to enjoy one, simply let it thaw at room temperature or in the refrigerator.
- Can I use a different type of nut butter in the caramel layer? Yes, you can substitute peanut butter with almond butter, cashew butter, or even sunflower seed butter for a different flavor profile. Just make sure the nut butter you choose is creamy and not too oily for the best consistency.
Tips for Perfect Snickers Peanut Brownie Bars:
- Use Parchment Paper for Easy Removal: Lining your loaf pan with parchment paper is a great way to ensure easy removal of the bars once they’re set. Leave some excess parchment paper hanging over the edges of the pan so you can lift the entire block of bars out after they’ve chilled, making cutting them much simpler.
- Allow Each Layer to Cool Completely: Patience is key! Make sure the brownie layer is completely cool before adding the caramel layer. If the brownie is still warm, the caramel may melt and become too runny. Similarly, allow the chocolate layer to set fully in the freezer before cutting the bars to avoid smudging or cracking the chocolate.
- Customize to Your Taste: Feel free to get creative with this recipe! Add a sprinkle of sea salt on top of the chocolate layer for a salty-sweet combination, or mix in some mini chocolate chips or chopped nuts into the brownie layer for extra texture. You can also try drizzling white chocolate or peanut butter over the top for a decorative finish.
- Keep Your Knife Warm for Cutting: When it’s time to cut the bars, run your knife under hot water, dry it off, and then slice. This will help you achieve clean, smooth cuts without cracking the chocolate layer.
Enjoying Your Homemade Snickers Peanut Brownie Bars:
These Copycat Snickers Peanut Brownie Bars are best stored in the refrigerator to keep the layers firm and the chocolate crisp. When you’re ready for a treat, simply grab a bar and indulge in the perfect combination of brownie, caramel, peanuts, and chocolate.
Not only do these bars satisfy your sweet tooth, but they also offer a more nutritious alternative to traditional candy bars.
A few other homemade candy recipes to try:
The BEST Gluten-free Twix Bars!
The BEST Healthy Snickers Recipe (gluten-free)
4-ingredient Reese’s Bars (gluten-free)
The BEST Gluten-free Millionaire Bars (vegan)
PrintCopycat Snickers Peanut Brownie Bars
Copycat Snickers Peanut Brownie Bars: A Healthier Indulgence! Make the store-bought Snickers Peanut Brownie Bars but using all gluten-free and vegan ingredients.
- Prep Time: 10 mins
- Cook Time: 20 mins
- Total Time: 1 hour
Yield: 8 large bars or 16 mini 1x
Ingredients
For the Brownie Layer:
- 1 1/2 cups almond flour
- 1/3 cup cacao powder
- 3 tablespoons coconut oil (melted and cooled)
- 2 tablespoons maple syrup or honey
- 1 teaspoon vanilla extract
For the Caramel Layer:
- 1/2 cup creamy peanut butter
- 2 tablespoons liquid coconut oil (melted and cooled
- 1/3 cup maple syrup or honey
- 1 teaspoon vanilla extract
- 1/2 cup roasted peanuts, halved (for topping!)
For the Dark Chocolate Layer:
- 1 1/3 cups chocolate chips
Instructions
- Preheat and Prepare: Preheat your oven to 350 degrees F. Grease a silicone loaf pan with coconut oil or line a loaf pan with parchment paper for easy removal of the bars later on.
- Make the Brownie Layer: In a large bowl, combine the almond flour, cacao powder, melted coconut oil, maple syrup or honey, and vanilla extract. Stir until the mixture is smooth and well combined. Press the batter firmly into the prepared loaf pan, ensuring an even layer across the bottom. Bake the brownie layer in the preheated oven for about 20 minutes, then set it aside to cool completely.
- Prepare the Caramel Layer: While the brownie layer cools, prepare the caramel layer. In a medium-sized bowl, mix together the creamy peanut butter, melted coconut oil, maple syrup or honey, and vanilla extract until the mixture is smooth and creamy. Once the brownie layer is cool, spread the caramel mixture evenly over it.
- Add the Peanuts: Gently press the halved roasted peanuts into the caramel layer, distributing them evenly across the top.
- Chill in the Freezer: Place the pan in the freezer for about 30 minutes to allow the caramel layer to firm up. This will make it easier to add the chocolate layer on top.
- Melt the Chocolate: Melt the dark chocolate chips in a microwave-safe bowl, heating in 30-second intervals and stirring between each interval until fully melted. Alternatively, you can melt the chocolate on the stovetop using a double boiler.
- Add the Chocolate Layer: Remove the pan from the freezer and pour the melted chocolate over the caramel and peanut layer. Spread the chocolate evenly to cover the entire surface. For an extra touch, you can sprinkle a few more chopped peanuts on top of the chocolate before it sets.
- Final Chill and Serve: Return the pan to the freezer for about 1 hour, or until the chocolate layer is fully set. Once set, lift the bars out of the pan using the parchment paper, and cut them into even pieces.
Notes
*Store in fridge for 5 days or freezer for 2 months

 Share this recipe